|
|
Washington DC's Union Station is without question one of the largest, most elaborate, and most grandiose train stations the world has ever seen, or likely ever will see. If you are a train fan, and especially if you have any interest at all in period architecture or "beaux arts" style buildings, then by all means, take a weekend afternoon to visit this monster monument to train travel. After decades of neglect following the decline of railroading in America, Congress acted to restore Union Station to full glory in the late 1980's. Realizing that long-term, Union Station needed to be self-sustaining, the secondary concourse ("rear") was converted into a market place - essentially an all-out shopping mall, complete with the most popular clothing stores, book stores, art and souvenir shops. It also boasts a complement of four or five restaurants, any of which may serve as a nice dinner finale for your afternoon stroll through this magnificent temple to passenger railroading.
|

The Main Hall of the Real McCoy.
|
As a kid, I had mused about the possibility of making some sort of O-gauge rendition of Washington Union Station (WUS), but I never attempted one. Many years later, as an adult re-entering O-gauge, I read an article in Classic Toy Trains (CTT) magazine. The feature article was on a layout owned by "Doc Colvin" - no other reference was provided, and to this day I don't know who he is or how to get in touch with him.
Doc Colvin's layout featured a very nicely rendered O-gauge version of WUS. The CTT article had a nice, large spread of this model, which I scanned and printed for myself because I was so taken with it. I guess it was that article, when it dawned on me that modeling Union Station in O-gauge is the logical penultimate goal for my eventual layout. This is especially true since I am enamored with passenger trains. Of all the buildings and structures I have made for my layout - even the 22-story skyscrapers - nothing will be more poignant than Union Station. Train layouts are about trains, and though I continue to take great joy in creating a wide variety of interesting structures to flesh out a decidedly urban world for them, the centerpiece of this world cannot possibly be anything but a giant train station.
|
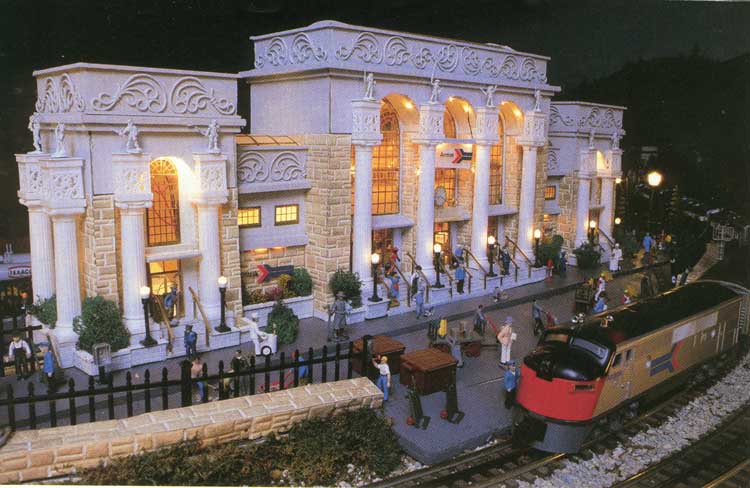
Doc Colvin's WUS.
|
I think I had realized pretty early on that this could not be a full-scale model. At more than 760 feet wide, a 1:48 scale model of Union Station would occupy a footprint larger than most O-gauge layouts - nearly 16 feet! Doc Colvin's WUS was nicely done - unmistakably Washington DC's station, but of course vastly compressed and simplified (as is mine), and implemented with a stylized, tinplate-esque feel.
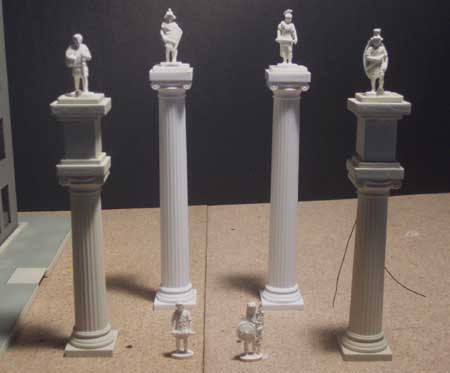
Later, I realized where they had obtained the columns used on the front facade. They are actually plastic wedding-cake tier supports, and I stumbled across them quite by accident while perusing a local Michael's craft store. They are near-perfect matches for the columns used in Washington DC's Union Station, and they even make two sizes - tall ones for the main, central building, and short ones for the east and west wings. I bought the columns in both sizes, and immediately painted them and started to look for appropriate Roman centurion statues to put on top. I experimented with these columns, on an ad-hoc basis, for nearly two years before I even started on the first elevation piece for my Union Station model. I guess that is the true beginning of construction for this model. Separately, I had been building lots of structures for my eventual layout. Oddly, the first building I ever made as an adult was West Park Tower - a 22-story skyscraper nearly 5 feet in height. That building consists of over 650 individual windows, which I laboriously cut out of the matteboard myself with an X-Acto knife and metal straight edge.
|
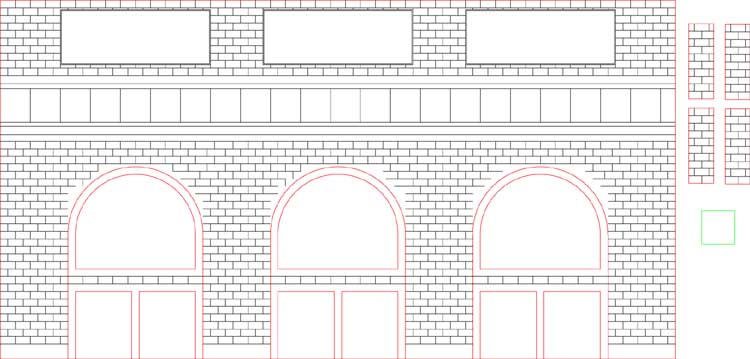
The very first CAD design - the front elevation of the Main Hall.
|
Upon completing that experience, I knew there had to be a better and easier way to get things cut for my projects. It was around this time that I started to experiment with CNC laser processing.
With laser processing, you design an "elevation" in a computer drawing program. An "elevation" is essentially just a "wall", or building front, with all the architectural detail, windows, moulding, etc. The resulting computer design is usually called a CAD (Computer Aided Design) file, and this can be done in virtually any "vector-based" drawing program. Since my wife was so familiar with it, I chose Adobe Illustrator (it's very popular). When the CAD is complete, you send it to a laser shop. They place a sheet of material (1/16" styrene, in this case) on their laser-cutting machine, and then the CNC-controlled laser actually etches and cuts your design into the material. This is a very powerful concept; akin to the difference between typing documents the old-fashioned way on a typewriter, and word-processing. Even if you end up goofing and sending a design to be implemented which is flawed, you can easily change the design and send it for another implementation. Like realizing you mis-spelled something in a document after it's been printed, you can always correct the document in the computer file and simply print it again. With lasering styrene pieces, it's costly, but not nearly as painful as implementing something from scratch and making a mistake half-way through it, forcing you to start all over again with a new, custom implementation.
|
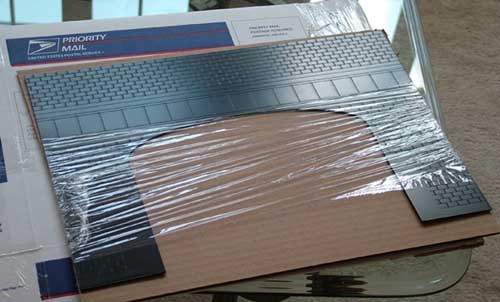
This is what the lasered sheets look like when they arrive from the laser shop.
This is one of the two sides to the Main Hall building.
|
I started to put together the front elevation of the Main Hall in November, 2004. I printed out multiple copies during the process, and taped the printouts to matteboard. I then stood this up on a table, and held up the columns with statues to see what it looked like, and to ensure that the tops of the columns aligned with the proper masonry etchings, etc. After much exhaustive experimentation and double-checking, I finally ordered the Main Hall front elevation from the laser shop in December, 2004.
The pieces arrived about a week later, and I was thrilled with the results. The etchings and cuts are crisp, even, and perfect. The three giant arch-portals are clean, round, and match each other exactly. This is one of the greatest aspects of this technique: by using computer design and CNC-controlled laser to fabricate these parts, the architectural aspects of the final products are mathematically perfect in design, and literally "laser-accurate" in implementation. For a person of my modeling skills, and a project such as this one, this really meant the difference between being able to make this model, or not. The first piece I had lasered - the front of the Main Hall - was rendered into 1/16" white styrene. I had already determined that I would be painting this station with American Accents Sandstone spray paint, and that I would have to use some kind of blackwash technique to get the brick etchings to "show" after being painted. This proved true with the Main Hall front, since I had it done in white styrene sheet.
|
Overhead looking down on the Main Hall front wall.
|
But from that point on, I instructed the laser shop to implement the designs in black styrene sheet, and this made a big difference. By lightly spray painting the black styrene pieces, the black base color naturally showed in the etched brick patterns and other details, and then I merely had to use the blackwash to give the station a very mild weathering job.
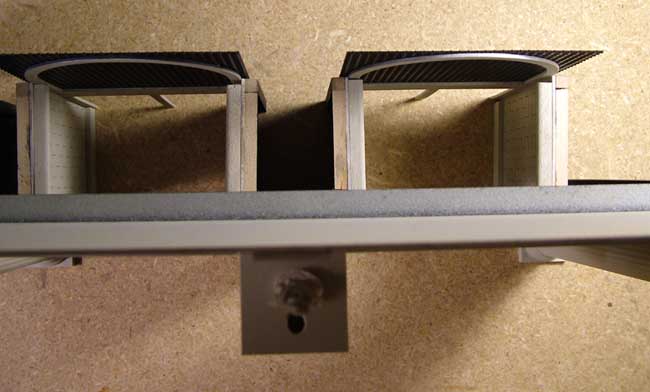
The Main Hall has three large arch portals, which are recessed 2.5" into the building. This meant I had to get six rectangular pieces made to serve as the walls of the recessed arch portals. The arched cutout for the portal could then serve as the "face" of the recessed wall, where the doors and open grille work would be. As you can imagine, a lot of framing went into this, to make it strong and also to keep things reasonably aligned so that barrel ceilings could be installed later.
|
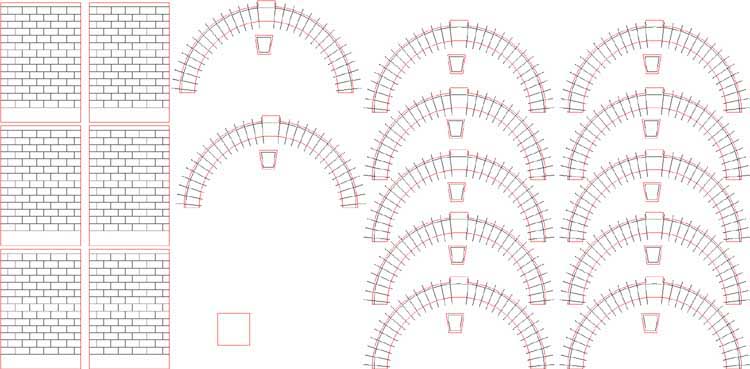
The second CAD design. These are the add-on detail pieces to the Main Hall front, as well as a slew
of extra "eyebrows" with matching keystones for the interior.
|
These techniques encompass most of what this model ended up being based on: CAD designs for the elevations and some detail parts, lasered into black 1/16" styrene, which I structurally framed, painted, lightly weathered, and then assembled. This would eventually take me to project completion without incident, save some mild frustration with the "glass" pieces, which will be shown in the Main Hall section.
Lasering with CAD designs is a fantastic approach, and I have become completely addicted to getting my parts and elevations lasered. But it has its drawbacks:
|