"West Park Tower," right after the sidewalks were installed, but before trees, street lights, and people. |
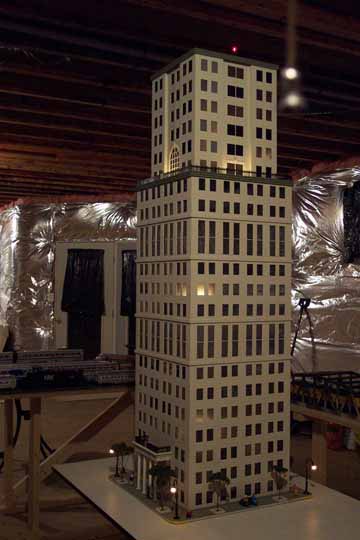
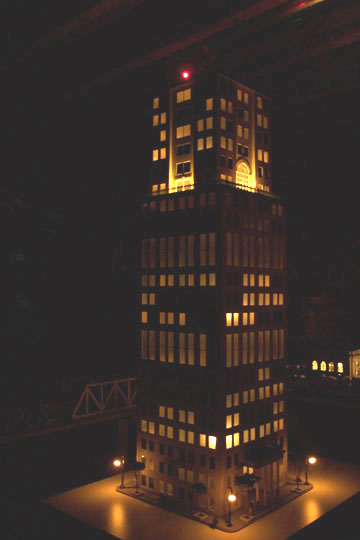
One of the few good shots of the completed building in the dark. |
||||

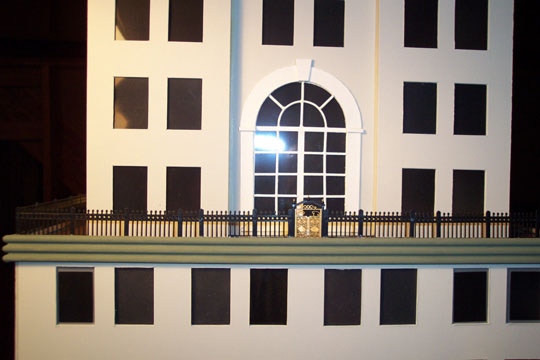
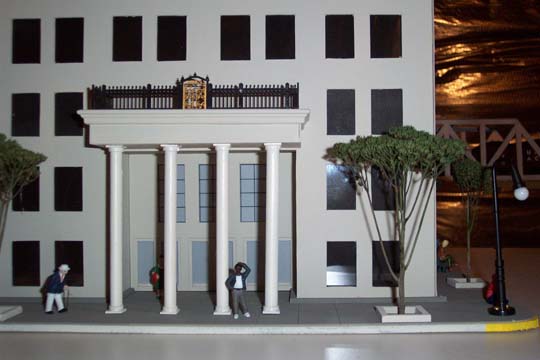
A closer picture of the front portico. Some will recognize the black iron railings that are available from ModelPower. |
I always had an interest in making a real downtown scene of a good-sized city for my layout. It's difficult to marry this with
an equal interest in keeping the layout focused on trains. As much as I enjoy the large, office-style downtown buildings, I don't
want to end up with a layout that is really just a model city that happens to have a train running around it. Know what I mean?
What will end up happening, then, is that I will create a relatively realistic, yet totally ficticious city - one where trains are heavily integrated into the downtown area. This will be easy for the train stations, but getting the rest of the main lines to weave in and out of the city buildings will be challenging. |
|
A close-up of the upper palladian window, on the front face of the building. The green crown molding is simply called "screen border", and is readily available at any home improvement store. |
The windows were without question the most difficult part of creating this building. Each one was individually cut out of cardboard
matte using an X-acto blade. All 650 of them. That's one of the reasons they look a little shoddy - especially in the corners. These pictures are hiding
a lot of details which would reveal flaws that would drive most "high-railers" crazy. But for me, this comes close enough. My intent
with these buildings is mostly to create an impression. At the same time, I try to realize as much detail as possible without making a
career out of mending little corners, and painting little bird droppings on the sidewalks. I mean, if I'm going to make a multi-block city,
that implies at least seven or eight good-sized buildings. And I just can't spend that much effort on each one. Compromises have to be made.
There is no interior finishing. The windows are not only tinted dark - to keep existing light from getting inside and artificially illuminating it - but they are also "foggy" so that viewers cannot really see inside. The internal lights inside still cause the windows to glow for night scenes, and the end result is very stylized. Although not convincing on an individual, building-by-building view, it is surprisingly realistic when stepping back and taking in a city of a dozen or more of these buildings. |
|
Interior of the lower building, during re-furbishing. The corner braces are very easy to install, and made the building many times more sturdy. |
There are also two red marker lights on the roof, and four external "mood lights" which light up the middle sections of all four sides of the
upper building. This is better shown than described, and I apologize for the crummy quality of these pictures. Digital cameras generally have a
hard time with under-lit indoor shots, and this kind of photography looks like it's maxing out the little Kodak's capabilities. Not to mention
the operator's... :)
Anyway, these external lights are placed on the roof of the lower part of the building, and they cast light upwards against the sides of the upper building. This casts elongated shadows which help create the illusion of even greater height. |
|
Adding people to the scene really brings things to life. |
The first time I thought I had completed this project, I learned two very important things: 1) you really can't build these things strong enough, and 2)
the window material I used was far too flimsy to rely on for the look of a solid pane of glass. So I ended up refurbishing the whole thing with plexiglass.
This is even harder than it sounds when you realize that plastic and cardboard do not glue together well. I had to use a very special and yucky kind of
adhesive in order to attach the plexiglass pieces to the existing cardboard matte. Then I had to strengthen the whole structure with horizontal wood struts
and corner braces. These corner braces lended a tremendous amount of strength to the overall building.
Also during the overhaul, I decided to "black out" more windows than I had originally. This is important for a reasonably realistic night-time scene: you'd be surprised how few windows are actually lit on a real skyscraper at night. |
|
Gluing on the ModelPower black iron railings to the upper section. You can see the central dowel next to the table which is mounted into the center of the sidewalk/base, that isn't visible here. The dowel has four lights mounted on it. |
I learned a lot about electrical wiring, too. Although fairly straight-forward, I realized half way through making this thing that the wiring needs to be as
modular as possible. I end up taking the building apart and putting it back together again quite a bit - much more often than I'd like. When I do, all the
wire connections I had made by just twisting them together (a terrible practice) must be forced apart so that I can separate the roof, upper building, lower
roof, and lower building. This disassembly is necessary even for just replacing a burned-out bulb. So I got a pack of male-female quick-disconnect plugs from Radio Shack
and crimped these onto the connections, and I can't tell you how worthwhile this is to do. Disassembling and reassembling the building can now be done in a
fraction of the time it used to.
The interior lights are simply mounted on a dowel that runs vertically in the center, which is mounted in the wooden base. The interior lights for the upper section are mounted an another dowel, this one suspended from the upper roof. |
|
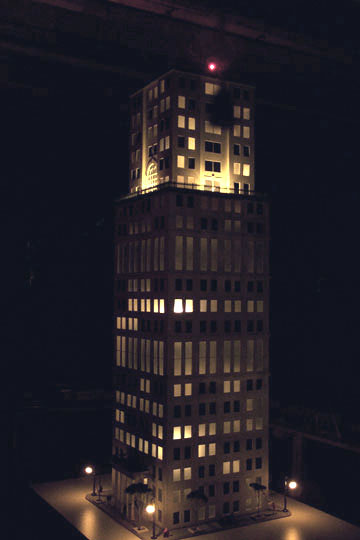
Finally, a quasi-night shot. The blurry, silver UFO hovering next to the building is the pull-chain for the ceiling light that I neglected to push aside for the photo. |
All the lights are standard incandescant bulbs, and here's where you could get into a long technical discussion of why this is a bad idea. Why not use LEDs, you ask? LEDs are far superior to regular (incandescant) bulbs in just about every way: they have no filaments in them, so they pretty much never burn out; they run on a fraction (somewhere around a tenth) of the amount of electricity; and they burn cool to the touch which is a plus for lighting models made of wood and cardboard (very combustible materials). Well, I won't argue with any of that, but the big problem with LEDs is that they only run on DC current, which means I either have to go and buy a separate, DC-output transformer just to light up these buildings (which is a possibility I'm looking into presently), or install a bunch of bridge rectifiers at the power leads for the buildings to convert the AC power to DC. Moreover, although red, green, blue, amber, and many other hues are available in LEDs, the newer white LEDs are not only hard to find, but very expensive. So for now, my first two building projects will be lit by good-old incandescant bulbs. | |
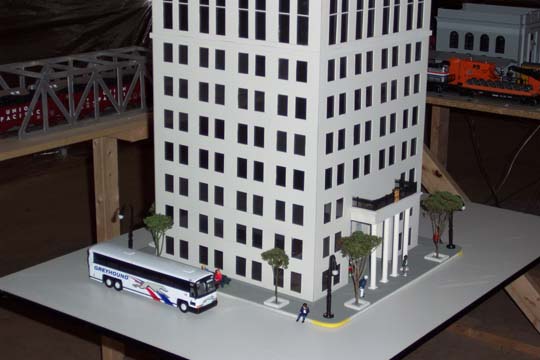
Getting closer to the final product here. The trees are "real" in the sense that they are clippings from a plant called "Cedum." |
Before you ask: yes, those are MTH RailKing street lights on all four corners of the base. The people are K-Line, as well as the benches. The bus is a Corgi modern
Greyhound, but the sidewalk is just more custom-cut cardboard matte that I scored the grid lines into with an X-acto knife, and then spray painted grey.
The trees are a gift from my Dad. He grows this stuff called "Cedum" in his back yard. He tells me that it grows almost anywhere, and I need to obtain some more from him to plant in my yard. This stuff makes perfect trees, in my opinion. I just cut them to the length I want, then spray them with a plastic sealer (clear coat fixative), and then spray the tops with a green spray paint of some kind. Very simple, extremely inexpensive, and far more realistic than the trees you can buy from scenery makers, in my opinion. |
|
Eventually, the building will be placed on a standard train table that has streets already painted ashpalt-black, which should offer some contrast against the curb and sidewalk. |
One of my major goals is to learn how to make large, quasi-realistic buildings in the most inexpensive ways. I use inexpensive materials and paints, and I only resort
to pre-made stuff when it really makes sense. The black iron fencing is an example. At first, I tried to make this myself with little wooden twigs, but this was not
only excruciatingly difficult and time-consuming, but too fragile to be practical. The black iron fence is from Model Power - I used two packages (one and a half, really)
of the HO scale version (the O scale was too big for what I was trying to do here). It's only about $8 a package.
Total building costs, including the wooden base with sidewalk, all 16 light bulbs, the RailKing street lights (which run an astonishing $12.50 each), cardboard matte (or "museum board" will also work - although more expensive), wooden square dowels for the corner struts and framing, a bottle of white glue, and paint - is probably in the neighborhood of $150. |
|
A "night" shot. This camera just doesn't like low-light scenes. This was taken on a tripod with a full 1.5-second exposure. |
Which is a whole lot less than you'd pay for something like this (if it were available) from one of the O-scale accessory makers. Can you imagine how much Lionel would
charge for a 22-story skyscraper like this? Or MTH, who wants $130 for a little McDonalds? Another thing to consider is that it's taken me almost a year to complete
this project (obviously on a part-time "hobby" basis.) That comes down to about $12.50 a month, which should fit any O-guage hobbyist's budget.
Oh by the way - although I refurbished the windows using plexiglass, that was only because my first choice for window material was very flimsy and ended up looking like I just stapled some translucent trash bags all over the inside. In my subsequent building project (affectionately dubbed "building 2") I'm using a much more practical and far less expensive window material. Go to your local Office Depot and look for the smoke-gray plastic folders shown in the photo. This stuff cuts like butter, yet is "dimensionally stable" enough to serve as windowing material. It's already tinted, and also has a "foggy" characteristic which is perfect for this application. |
|
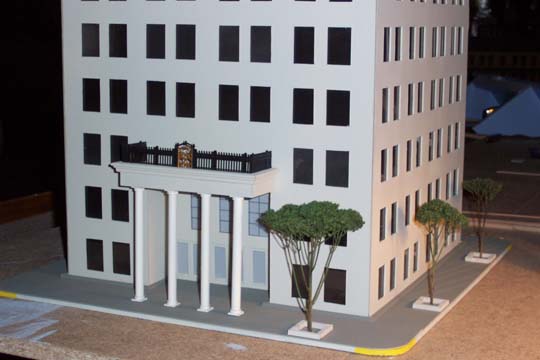
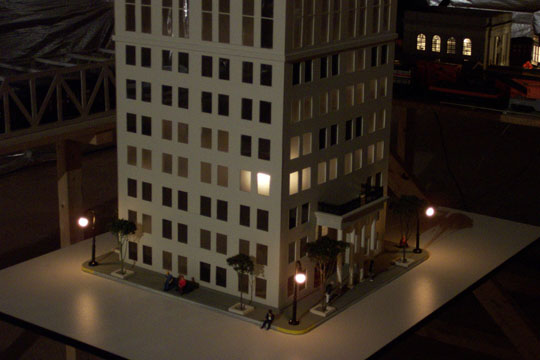
Another front scene, now with trees, street lights, and people. |
This building turned out better then I thought I could achieve, given my skills. It is by no means a "museum quality" piece, but I think it fits in well with the level of
realism in the rest of my layout.
The hardest, most tedious, and most time-consuming part was cutting out all those windows. There's got to be a better way. I started looking for existing materials
that already have these rectangular shapes cut out of them. One day, I glanced down at a pile of 35mm slides, and realized that these are perfect. It didn't take long
to find empty 35mm cardboard slide sleeves for dirt cheap on the Internet (see the section on "building 2" for details), and then I was able to create an entire new
downtown building from these - without cutting out a single window with my X-acto knife!
|